Not all rocks are created equal – and anyone who’s spent time drilling knows how dramatically different ground conditions can affect drilling performance. To get the most out of your DTH bits (and to choose the right one in the first place), it’s essential to understand how various rock drilling conditions impact bit behavior and life. In this article, we’ll break down common ground conditions – such as hardness, abrasiveness, fracturing, and the presence of water – and examine their effects on DTH drill bits. We’ll also discuss strategies to cope with challenging conditions and avoid excessive wear or damage to your bits.
Rock Hardness: Soft vs. Hard
Hardness refers to the rock’s resistance to indentation or scratching, often correlated with its compressive strength. This is one of the biggest factors affecting bit performance:
- Soft Rock (e.g., chalk, claystone, some limestones): DTH bits tend to cut through soft rock easily. Penetration rates can be high, but there’s a risk of over-drilling – the bit can bite too quickly and stall the hammer or cause it to bounce. Also, in very soft formations, the percussion might pulverize more material than the air can flush, leading to bit clogging. Soft rock usually causes minimal wear on carbides. However, if the soft rock is also sticky (like clay), it can plug up the bit’s face and holes.
- Impact on bits: Low abrasive wear, but possible clay packing or bit balling. Carbide buttons remain sharp longer. Bit body sees little wear.
- Bit selection: Bits with more open face designs (e.g., aggressive concave or drop-center) and larger flushing holes help prevent clogging. Ballistic buttons can improve speed in soft rock since durability is less an issue.
- Hard Rock (e.g., granite, basalt, quartzite): Hard rock drilling is where DTH shines, but it’s tough on the bits. Penetration is slower as the rock resists breakage. The hammer and bit must deliver high energy to chip away small fragments. Carbide buttons in hard rock experience high compressive stresses, which can cause micro-fractures or chipping, especially if they are too pointed. Hard rock also means more heat at the bit face from friction.
- Impact on bits: Potential carbide breakage or shattering if the wrong type is used. Spherical/domed carbides fare better here by distributing force (DTH Drill Bits – Mincon). The bit may develop fatigue cracks in the steel due to repeated high-force impacts.
- Bit selection: A robust bit – typically flat or convex face with spherical inserts – is chosen for hard rock. These maximize contact and minimize breakage. Newer hard-rock bits might have special anti-fatigue designs (like rubber dampers or optimized mass distribution) to extend life in hard pounding.
Strategy tip: In very hard rock, it’s crucial to maintain sharpening of carbides. Dull carbides increase impact stress on the bit and can cause a hard rock to act even “harder” on the bit. Regular regrinding in such conditions can prevent carbide breakage and sustain decent penetration rates.
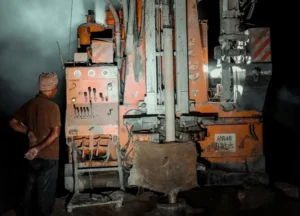
(Rock Drilling Photos, Download The BEST Free Rock Drilling Stock Photos & HD Images) Drilling into a solid, hard rock face using a top hammer method. In hard, massive rock like this, DTH bits need to be tough – using robust carbide buttons and durable designs to handle the high stress of each impact.
Rock Abrasiveness
Abrasiveness is the rock’s tendency to wear down the drilling tools, largely related to the presence of hard mineral grains like quartz. You can have a “soft” rock that’s highly abrasive (e.g., a loosely cemented sandstone with lots of quartz) or a hard rock that’s not very abrasive (e.g., some basalts).
- Low Abrasiveness: Rocks with low quartz content or fine, soft matrix (like shale, claystone, certain limestones) don’t grind away bits much. Carbide wear will be slow. In such cases, you might break the bit from forces before you wear it out from abrasion.
- High Abrasiveness: Sandstones, granite, schist, gneiss – these often contain significant quartz or other hard minerals. Drilling such rock is like drilling against sandpaper. The carbide buttons wear flat relatively quickly, and even the steel body of the bit can erode (body wash) if the cuttings aren’t cleared well (Maintain DTH Drill Bits: Prevent Body Wash & Extend Lifespan). Abrasive cuttings rubbing against the bit at high velocity act like an abrasive blaster.
- Impact on bits: Rapid wear of carbides (they lose shape and diameter, reducing effectiveness). The gauge area of the bit is particularly at risk – as it holds the hole size, it’s constantly rubbing against fresh rock. Abrasive rock can reduce bit diameter (gauge wear) significantly after drilling just a fraction of the distance that a non-abrasive rock would allow.
- Bit selection: Use bits with wear protection: extra gauge carbide inserts, wider carbide buttons, and hardened steel or hardfacing on the bit body. Some bits come with tungsten carbide tiles or inserts on the skirt for abrasive conditions. Also consider special carbide grades (slightly harder carbides for longer wear, though the trade-off is potential brittleness).
Strategy tip: In very abrasive conditions, it’s wise to monitor hole diameter periodically. If you see the holes are coming out under size due to bit wear, it’s time to pull the bit and either sharpen or replace it. Otherwise, you’ll slow down (due to dragging of an undersized bit) and risk the bit getting stuck.
Additionally, maintain strong air flow; not only for drilling efficiency but to flush out abrasive cuttings as quickly as possible. Re-circulating those cuttings in the hole will accelerate wear dramatically.
Rock Structure: Fractured vs. Massive
The structure or texture of the rock – whether it’s one solid piece or broken into many pieces – plays a big role.
- Massive (Competent) Rock: This is rock that is mostly intact, with few joints or fractures. Drilling massive rock usually yields more predictable behavior. DTH bits like this because they can maintain a steady resistance and progress. However, massive hard rock combined with a smooth surface can sometimes cause bit “wander” at the very start of a hole (bit may skate before it bites).
- Impact: Generally easier to keep the bit on track, less shock loading variability on the bit. The main concern is just the inherent hardness/abrasiveness addressed above.
- Selection: Standard designs work well. If initial collaring is an issue, using a pilot hole or a starter pad can help, but that’s more operational than bit-related.
- Fractured or Layered Rock: This includes rock with many natural cracks, bedded sedimentary layers, or alternating hard/soft seams. Drilling here can be tricky:
- The bit might drop suddenly into voids or softer layers, causing a loss of pressure on the bit then a sudden impact when it hits the other side of a crack – this shock can chip carbides or even shear them off.
- Fractures can cause deviation: the bit may follow the path of least resistance and shift along a crack. Even DTH, known for straightness, can slightly wander if the rock structure pushes it.
- In broken ground, cuttings removal may be easier (fractures give extra escape paths), but the risk of the bit getting wedged or pinched by a shifting piece of rock is higher.
- Impact: Potential for carbide damage and irregular wear. Bits might also suffer from “ringing” – when bouncing in and out of gaps, the percussive blows aren’t absorbed by rock as intended, which sends more shock back into the bit and hammer.
- Selection: A concave face bit often helps in fractured ground due to its self-centering nature (DTH Drill Bits – Mincon). It tends to hold the bit steady rather than allowing it to drift on a crack plane. Some drillers prefer a slightly softer blow (lower impact) in highly fractured rock – that’s more of a hammer adjustment, but using a bit one size down with a lighter hammer sometimes yields better results in extremely broken conditions (trading some penetration for safety of the tool).
Strategy tip: In fractured ground, reduce your feed pressure and percussion power a bit to avoid excessive shock when a fracture is hit. It’s also a good idea to use a stabilizer (a short subsurface collar with ribs) above the hammer if deviation is a big concern – though that’s an equipment add-on, not bit choice.
If the fractured zone is localized (say, a known fault zone), sometimes switching to a cross-over bit or drag bit for that interval, or even using a casing to get through it, could save your DTH bit from damage. You can resume DTH drilling once back into competent rock below.
Presence of Water or Fluids
Drilling dry vs. drilling with water in the hole makes a difference:
- Dry Conditions: Air flushing works efficiently. Bits stay relatively cool as long as air is circulating.
- Water Presence (Wet Rock or Groundwater): Water can cool the bit (good) but also cushion the impact and make flushing cuttings harder (bad). In water, cuttings may settle and not be lifted as easily by air. This can lead to buildup of cuttings (which grind the bit = abrasive wear) and even cause the hammer to slow (backpressure from water).
- Impact: If the hole floods, a standard air DTH hammer might stop if it can’t expel water. Bits in water may experience less heat-related wear, but corrosion could become an issue over time for the steel.
- Selection: For minor water influx, using a bit with additional flushing holes or a drop center can help keep things moving. If significant water, consider a water-powered DTH hammer or add foam to your air (a drilling foam can lift water and cuttings more effectively). Bit-wise, using carbide that resists corrosion (some carbides with certain binder compositions are slightly better in corrosive environments) or coatings on the bit could be beneficial if the water is acidic or salty.
Strategy tip: Manage water with correct techniques (submersible pumps to keep water level low, using mist/foam injection, etc.). From a bit perspective, ensure the flushing ports are not obstructed and possibly enlarge them if making a custom solution for a water-prone hole. Also, grease the bit shank when in watery conditions to stave off corrosion and ease removal (it’s part of hammer maintenance but saves bits from rust-locking into hammers).
Overburden and Transition Zones
Often, before hitting rock, you drill through soil or overburden. DTH hammers usually aren’t used until rock is reached because they need backpressure of rock to function well. However, sometimes you may have to start a DTH bit in a boulder field or a mix of soil and rock fragments:
- In overburden or loose conditions, a DTH bit can wobble, and cuttings removal is easy but can turn into a mess (as there’s no confining walls). Bits can experience erosion (much like abrasive wear) if rotating in a slurry of sand.
- If you suspect a mix of hard boulders in softer matrix, you might choose a bit that’s a bit heavier-duty than normal for that hardness, since the intermittent hits on boulders are like impact spikes.
Often, the solution for overburden is to case it off or use a different drilling method (like ODEX/Eccentric bits or casing-advance systems). But keep in mind a scenario: drilling hard limestone with intermittent karst cavities (open voids) – your bit might suddenly be in “no rock” and spinning in air/mud, then strike rock again. This is similar to fractured ground issues: it’s the inconsistency that’s hazardous for the bit.
Matching Bit Design to Conditions
To wrap it up, let’s summarize a matching of bit features to conditions:
- Hard, Competent, Abrasive Rock -> Flat/convex face, spherical inserts, premium wear protection (to survive hardness and abrasion).
- Medium-Hard, Fractured Rock -> Concave face, semi-ballistic inserts (to maintain straightness and reasonable speed).
- Soft, Non-Abrasive Rock -> Drop-center or concave, ballistic inserts (for fast cutting, with ample flushing to prevent clogging).
- Abrasive but Soft (e.g., sandy dolomite) -> Convex face, hardened gauge, perhaps diamond-coated inserts if extreme (to handle abrasion even though rock isn’t hard).
- Water Present -> More flushing, consider corrosion-resistant bits or bits compatible with mist/foam drilling.
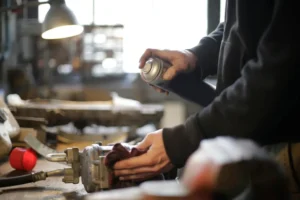
(DTH Drill Bits for Precision Drilling | Rock drill bits | Drill King) Close-up of a DTH bit after drilling in abrasive, broken ground. The formerly sharp carbide buttons are worn and rounded, and the bit body shows scoring. Understanding the rock conditions (in this case, hard and abrasive) allows drilling crews to predict wear like this and choose bits accordingly.
Adapting to the Conditions: Best Practices
- Start with the Right Bit: Use the guidelines above (and manufacturers’ recommendations) to select a bit suited for the hardest or most abrasive part of your formation. You can be slightly “over spec” for easier layers, but you don’t want to be “under spec” when you hit the tough section.
- Adjust Drilling Parameters: Once drilling, continuously monitor how the bit is performing. If you see excessive dust (could mean too little flushing or too hard a push pulverizing rock), adjust airflow or weight on bit. If penetration drops sharply, maybe the bit is dull or encountering a harder streak – time to sharpen or change strategy.
- Use the Right Hammer and Extras: Sometimes a different hammer (e.g., a slower, harder hitting hammer vs. a faster, lighter hitting) can pair better with a given rock. In very hard rock, a slower, heavy piston hammer can be beneficial. Accessories like shock absorbers can protect drill string in jerky ground, and stabilizers help in broken ground.
- Maintenance: As covered in the maintenance section of this series – maintain sharp carbides, clear flushing holes, etc. Especially important when conditions are harsh (abrasive/hard) because they’ll exploit any weakness in your bit quickly.
- Know When to Pull Out: Pushing a bit too far in nasty conditions can lead to catastrophic failure (like the head shearing off). It’s usually more cost-effective to swap in a fresh bit than to try to squeeze every last meter out of a worn one in tough rock, which could risk an in-hole failure that costs hours or days.
By being mindful of how each rock condition affects your DTH bits, you can make smarter decisions both in preparation and on the fly during drilling. This will ensure higher productivity, fewer broken tools, and ultimately a more successful drilling project.