DTH drill bits are built tough to pulverize rock, but they won’t last long without proper care. In the field, these bits face intense wear from abrasion and repeated impacts. How you maintain and handle your DTH bits can dramatically extend their lifespan and save you money on replacements. In this article, we’ll cover practical maintenance tips – from routine inspections to sharpening – that will keep your DTH bits drilling efficiently for as long as possible.
(DTH Drill Bits for Precision Drilling | Rock drill bits | Drill King) A DTH drill bit after heavy use, caked in rock dust and debris. Regular cleaning and maintenance are essential to prevent such buildup from causing overheating or excessive wear.
1. Perform Regular Visual Inspections
Make it a habit to inspect your drill bits frequently, ideally at least once per shift or whenever a bit is pulled out of the hole. Look for:
- Wear on Carbide Buttons: Are the tungsten carbide inserts becoming flat or chipped? Buttons should be hemispherical or conical; if they wear flat, penetration drops and stress on the bit increases.
- Gauge Wear: Check the diameter of the bit’s gauge (the outer edge that cuts the hole to size). If the gauge buttons or shoulders are worn down significantly, the hole will become smaller than intended, causing drag and further wear (a vicious cycle). A caliper can measure bit diameter – if it’s, say, 5-10 mm under nominal size, that bit is near end-of-life.
- Cracks or Fractures: Inspect the steel body for any cracking, especially around the bit face or shank. Also look at the carbide buttons themselves for cracks. A cracked bit is a failure waiting to happen; it should be retired to avoid a dangerous shank break-off downhole.
- Washout and Erosion (Body Wash): This is the wear of the steel bit body, often just above the buttons, due to abrasive cuttings or an improper flushing. If you see the steel washed away flush with the carbide buttons, that’s a sign the bit has been overused without sharpening or that flushing is inadequate (Maintain DTH Drill Bits: Prevent Body Wash & Extend Lifespan) (Maintain DTH Drill Bits: Prevent Body Wash & Extend Lifespan). Body wash shortens bit life by weakening the hold of the carbides.
If any of these issues are spotted early, you can address them (e.g., sharpen buttons, adjust drilling parameters) before the bit is ruined. It’s far cheaper to regrind a dull bit than to run it to destruction.
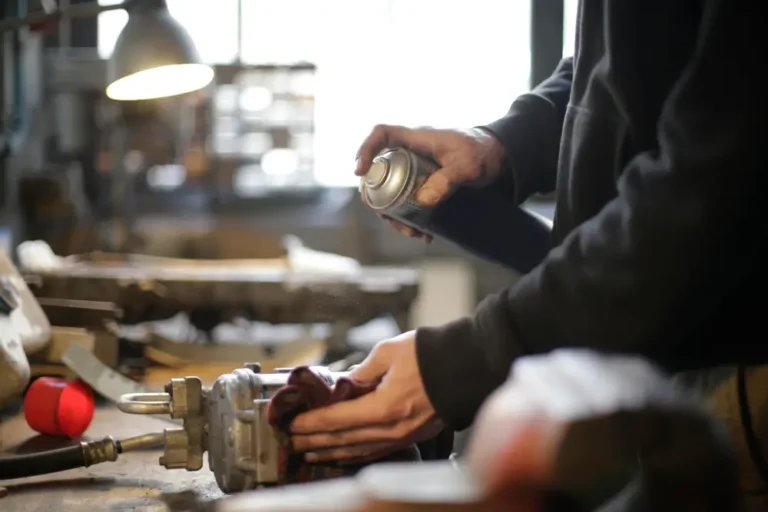
2. Keep Bits Clean and Handle Them Gently
After each use, clean the bit thoroughly. Remove any packed debris from the flushing holes and around the buttons. Dried mud or rock dust can harden and be as abrasive as sandpaper on the bit during the next use, causing overheating.
- Use a stiff brush or compressed air to clear out the holes and crevices.
- If drilling with water or mud, rinse the bit to remove any slurry or chemicals that could corrode it.
When transporting or handling bits, avoid dropping or banging them. The carbide buttons, while very hard, can crack if the bit is thrown onto a truck bed or hits another metal tool forcefully. Set bits down on wooden planks or rubber mats instead of concrete or steel surfaces. If a bit is threaded (for top-hammer bits, or DTH bits with removable backends), always use protective thread caps during storage.
Proper storage is part of cleanliness: store bits in a dry area, protected from rain and humidity to prevent rust. A light coat of oil on the steel surfaces can deter corrosion during long storage.
(Exploring Face Designs of DTH Drill Bits for Optimal Drilling) A DTH drill bit in like-new condition. Keeping bits clean, rust-free, and free of nicks or damage during handling will ensure they perform at their best and last longer.
3. Sharpen Carbide Buttons Periodically
One of the best ways to extend bit life is button sharpening (regrinding). Over time, carbide buttons become blunt or even develop a “mushroom” shape due to grinding against rock. Dull buttons dramatically reduce penetration rate and create more heat (which can lead to faster wear of both carbide and steel).
When to Sharpen: A general rule is to sharpen when buttons have lost about 1/3 of their height or if penetration has noticeably dropped. Some drillers do a light touch-up after a certain number of meters drilled (e.g., every 100–200m) as preventive maintenance. Definitely sharpen if you see any tiny fractures on a button – grinding off a small layer can prevent that crack from propagating.
How to Sharpen: Use a carbide grinding tool (handheld grinder or a specialized bit grinder). Typically a cup-shaped diamond grinding wheel is used to grind the carbide. Aim to restore the original profile (spherical or ballistic shape) of the button. Do not overheat the carbide while grinding – use coolant or take intermittent breaks, as excessive heat can cause carbide to crack or soften its braze bond to the steel.
Sharpening not only increases drilling speed but also reduces the stress on the bit and hammer. It prevents the scenario where a blunt bit is pushed harder and harder (causing body wash and possible hammer damage) (Maintain DTH Drill Bits: Prevent Body Wash & Extend Lifespan) (Maintain DTH Drill Bits: Prevent Body Wash & Extend Lifespan). Keep in mind carbide can only be sharpened so many times – eventually, if buttons are too short or broken, the bit has reached its end.
4. Monitor and Adjust Drilling Parameters
Sometimes what wears out a bit prematurely isn’t just the rock – it’s how the bit is being used. Pay attention to your drilling parameters and adjust them to be bit-friendly:
- Rotary Speed (RPM): Too high RPM can grind the bit unnecessarily, especially in hard rock, causing heat and wear. Too low can slow drilling and actually pound the same spot excessively. Follow the bit manufacturer’s recommended RPM range. Generally, harder rock = lower RPM.
- Feed Pressure: Insufficient feed force causes the bit to “hammer in place” without cutting, leading to excessive vibration and potential carbide breakage. Excessive feed, however, can cause the bit to stall or the hammer to slow, and can crush carbides. Find the sweet spot where the bit is biting steadily. If you see the drill string bouncing or torque spikes, adjust feed or rotation.
- Air Pressure and Flow: Make sure you’re using the appropriate air pressure for the hammer and bit. Too low pressure reduces impact energy (slowing drilling and potentially causing the driller to push too hard on the bit out of frustration). Also ensure adequate air volume to flush cuttings – if cuttings aren’t clearing, they will recirculate and erode the bit (akin to sandblasting the steel).
- Avoid Prolonged Rotation without Percussion: If the hammer stops (for instance, due to low air or a pause), do not continue to rotate and push the bit into the rock – this will rub the carbide on rock and flat-spot them quickly. Stop drilling if the hammer isn’t striking.
- Adjust for Changing Ground: If you drill from soft into hard rock, or encounter a void or a different layer, be ready to tweak settings. For example, when transitioning into harder rock, slow down the penetration rate by easing feed or you risk shattering buttons.
By tuning these parameters, you not only improve drilling efficiency but also reduce unnecessary wear on the bit. Many modern rigs have instrumentation – use it to monitor weight-on-bit, pressure, etc., and keep them in optimal ranges.
5. Replace or Rebuild Worn Components Timely
Even with great care, DTH bits will eventually wear out. The key is to recognize end-of-life and replace bits before they fail catastrophically:
- Once gauge wear is beyond spec (hole size is under diameter by a significant margin), retire the bit. Using it further risks getting the bit stuck as it can’t drill a clearance for itself.
- If carbide buttons start popping out (a sign of extreme body wear or braze failure), stop using that bit. A thrown carbide in the borehole can cause big problems.
- Keep a maintenance log: Record how many meters (or hours) each bit has drilled and its condition after use. This helps predict lifespan. For example, if a particular bit usually lasts ~300m in your condition, you might proactively replace around 250m to be safe.
- Consider professional bit refurbishment: Some companies can re-tip bits (replace worn carbides with new ones) and build up worn gauge with hardfacing. This is usually economical for large bits. If you have a set of large-diameter bits, refurbishing them once or twice can be cheaper than buying new. Ensure it’s done by a reputable shop and that the bit is heat-treated properly after.
- Don’t forget the DTH hammer maintenance as well – a poorly performing hammer (worn piston, seals) can reduce impact and make it seem like the bit is dull when it’s actually the hammer losing efficiency. Maintain both in tandem.
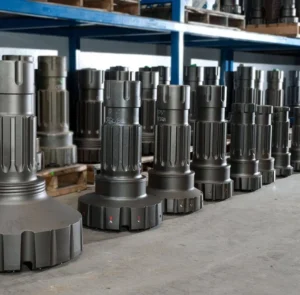
(Exploring Face Designs of DTH Drill Bits for Optimal Drilling) Freshly prepared DTH bits in storage after maintenance. Having a few well-maintained spare bits on hand means you can swap out a worn bit as soon as it starts underperforming, rather than pushing it to failure.
6. Additional Tips and Tricks
- Lubricate the Hammer: While this is hammer maintenance, it affects bit life. A well-lubricated hammer (via adding rock drill oil into the airline) will strike more consistently and reduce heat. That indirectly helps your bit last longer and can prevent the bit shank from galling or seizing in the hammer.
- Avoid Excessive Blow-Off: When the bit breaks through into a void or finishes the hole, the hammer might free-spin and strike without resistance. Try to stop hammering as soon as you break through to avoid ringing the bit against nothing – this situation can crack carbides or shank.
- Use New Bits for Hard Ground, Old Bits for Easy Ground: If you anticipate some very hard sections and some soft sections in a job, you can preserve your best bit for the hard stuff and use a older bit in softer zones. Softer rock is easier on bits, so an older bit can still manage without wearing too fast.
- Train the Crew: Ensure that anyone operating the drill rig or handling bits is aware of these maintenance practices. A lot of bit damage can happen simply from mishandling or ignoring the warning signs.
Conclusion
Investing a little time in maintenance can pay big dividends in extending the life of your DTH drill bits. By inspecting regularly, cleaning and storing bits properly, sharpening them when needed, and monitoring your drilling parameters, you’ll get significantly more drilling done per bit. That means lower cost per meter and fewer interruptions to change tools. Remember that a well-maintained bit not only lasts longer but also drills faster during its life. Treat your DTH bits well, and they will reward you with efficient, trouble-free performance shift after shift.